Search for Authentication with Flask and refer to blogs and videos to implement registration, login, and logout functions to the Flask Blog App we created last time.
The user with user_id = 1 will be designated as admin and will have posting, editing, deleting, and commenting privileges, while other users will be granted only commenting privileges. (The comment function is not implemented at this time.)
General Flow
Reference: Digital Ocean Tutorial
- Using Flask authentication package and SQLAlchemy (user database)
- Roughly write the main application (movement around authentication) and tie it to the database.
- Set up Routes for registration, login, and logout to skip to each page.
- Create a template (HTML) for each
- Create a model to be stored in the database
- Linking registration pages, authentication functions, and databases
- Add UserMixin to make Flask-Login work
- Specify “find user from database” in user loader
Reference: How To Add Authentication to Your App with Flask-Login
Reference: Flask-Login
Reference: Python Flask Tutorial 6 – Add Authentication to Web App with Flask-Login
Reference: Authentication and Authorization With Flask-Login
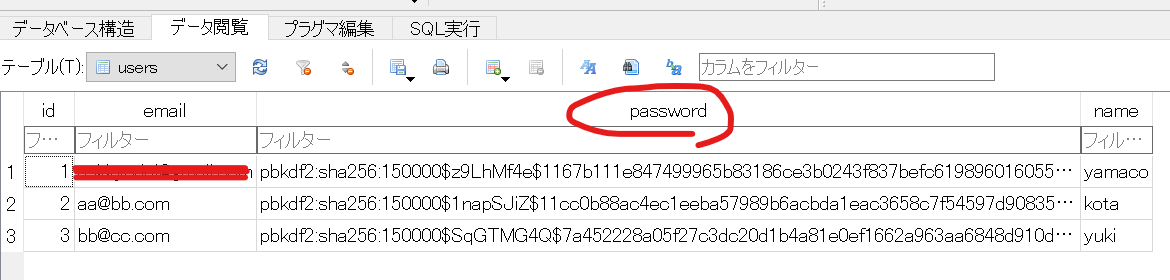
Password hash and salt
Hashing: To put the input value through a function that converts it into an “incomprehensible string. Although it is a “hard-to-understand string,” if the input values are the same, the same string will be returned.
Salt: To make the hashed password even stronger by adding a string of characters before or after the original password.
Salt + hashing = even if users have the same password, thanks to the salt, different values (passwords) are stored for each user
Salt Round:
ラウンド1 (パスワード + ソルト + ハッシュ関数)=「わかりづらい文字列A」
Round 1 (password + salt + hash function) = “incomprehensible string A”
ラウンド2 (「分かりづらい文字列A」+ ソルト + ハッシュ関数)=「分かりづらい文字列B」
Round 2 (“incomprehensible string A” + salt + hash function) = “incomprehensible string B”
ラウンド3 (「分かりづらい文字列B」+ ソルト + ハッシュ関数)=「分かりづらい文字列C」
Round 3 (“incomprehensible string B” + salt + hash function) = “incomprehensible string C”
The more the above rounds are repeated, the more the “incomprehensible string” becomes “a level that takes years to understand”.
Password hashing and salt should be specified as follows
from werkzeug.security import generate_password_hash

good_password = generate_password_hash(
    form.password.data,   # 登録フォームのパスワードデータを取ってくる
    method='pbkdf2:sha256',   # ハッシュ関数
    salt_length=10
    )
The GeneratePasswordHash method takes a password string and a salt string, connects them, and calculates a hash of the values using SHA256. SHA256 returns a 256-bit fixed-length hash for an input of any length. PBKDF2 stands for Password-Based Key Drivation Function 2, which is part of the RSA Laboratory’s Public Key Cryptography Standard (specifically, the PKCS#5 password-based encryption standard) and is a method proposed in RFC 2898 This method is proposed as RFC 2898. This method allows the user to specify the number of hash iterations for stretching.
C# による SHA256 と PBKDF2 によるソルト付きパスワードのハッシュ計算方法
When I open the database, a simple password has been converted into an “incomprehensible string” and stored!!!

Reference:ソルト【パスワード】(英:salt)とは
Reference:Hashing Passwords With Werkzeug – Flask Fridays #13
Reference:werkzeug
Add users to the blog application
Now, let’s follow the general flow of the system and allow users to register, log in, and log out.
I will also try to save the password as salt + hashed.
Flow 1: Using Flask authentication package and SQLAlchemy (user database)
pip3 install flask flask-sqlalchemy flask-login#省略
from flask_sqlalchemy import SQLAlchemy
from sqlalchemy.orm import relationship
app.config['SQLALCHEMY_DATABASE_URI'] = 'sqlite:///blog.db'
app.config['SQLALCHEMY_TRACK_MODIFICATIONS'] = False
db = SQLAlchemy(app)
class User(UserMixin, db.Model): # UserMixinでログインしているユーザーの情報を保持する
__tablename__ = "users"
id = db.Column(db.Integer, primary_key=True)
email = db.Column(db.String(100), unique=True)
password = db.Column(db.String(100))
name = db.Column(db.String(100))
posts = relationship("Post", back_populates="author") # Postと関連づけ、authorとuserを紐づけている
class Post(db.Model):
__tablename__ = "blog_posts"
id = db.Column(db.Integer, primary_key=True)
author_id = db.Column(db.Integer, db.ForeignKey("user.id"))
author = relationship("User", back_populates="posts") # Userと関連付け、authorとpostを紐づけている
title = db.Column(db.String(250), unique=True, nullable=False)
subtitle = db.Column(db.String(250), nullable=False)
date = db.Column(db.String(250), nullable=False)
body = db.Column(db.Text, nullable=False)
img_url = db.Column(db.String(250), nullable=False)
# 省略Create a registration form (RegisterForm) in “forms.py” and register.html in the “templates” folder so that new users can register.
“Flask-WTF” is used for the form, which was used last time.
pip3 install Flask-WTFOnce Flask-WTF is installed, import it with forms.py.
from flask_wtf import FlaskForm
from wtforms import StringField, SubmitField, PasswordField
from wtforms.validators import DataRequired, URL

class RegisterForm(FlaskForm):
    email = StringField("Email", validators=[DataRequired()])
    password = PasswordField("Password", validators=[DataRequired()])
    name = StringField("Name", validators=[DataRequired()])
    submit = SubmitField("Sign Up")
Flow 2, 3, 4:.Roughly write the main application (movement around authentication) and tie it to the database.
Set up Routes for registration, login, and logout to skip to each page.
Create a template (HTML) for each
Describe the above flow 2-4 for registration and login. Repeat (1), (2), and (3) below. No form is required for logout.
<1) Form ②@app.route(‘registration and so on’) and movement settings ③ Form display in HTML >.
※ Here, also set the password “Salt + hashed”.
@app.route('/register', methods=["GET", "POST"])
def register():
    form = RegisterForm()
    if form.validate_on_submit():

        good_password = generate_password_hash(    # ここでパスワードをgood_password名づけてハッシュ化
            form.password.data,
            method='pbkdf2:sha256',
            salt_length=8
        )
        new_user = User(
            email=form.email.data,
            name=form.name.data,
            password=good_password,   # パスワードを「good_password」で保存
        )
        db.session.add(new_user)
        db.session.commit()
        login_user(new_user)
        return redirect(url_for("get_all_posts"))

    return render_template("register.html", form=form, current_user=current_user)
In register.html, display wtf.
{% extends 'bootstrap/base.html' %}
{% import "bootstrap/wtf.html" as wtf %}

省略

 <div class="container">
    <div class="row">
      <div class="col-lg-8 col-md-10 mx-auto">

       {{ wtf.quick_form(form, novalidate=True, button_map={"submit": "primary"}) }}

      </div>
    </div>
  </div>

省略
To enable registered users to login, write (1) “login form”, (2) “@app.route(‘/login’, methods=[“GET”, “POST”])” and (3) “login.html”.
class LoginForm(FlaskForm):
    email = StringField("Email", validators=[DataRequired()])
    password = PasswordField("Password", validators=[DataRequired()])
    submit = SubmitField("Login")
The following is a list of registered users to be found in the database and logged in.
At this time, check the password that was “salt + hashed” during registration: “check_password_hash()”.
from flask_login import login_user, logout_user

login_manager = LoginManager() # flask-loginの初期化
login_manager.init_app(app) # flask-loginの初期化

@login_manager.user_loader  # ユーザーを user_id でロードする
def load_user(user_id):
    return User.query.get(int(user_id))

@app.route('/login', methods=["GET", "POST"])
def login():
    form = LoginForm()
    if form.validate_on_submit():
        email = form.email.data
        password = form.password.data

        user = User.query.filter_by(email=email).first()

        if user and check_password_hash(user.password, password):  # ここでハッシュ化されたPWをチェック
            login_user(user)
            return redirect(url_for('get_all_posts'))

    return render_template("login.html", form=form)
In login.html, display wtf (same work as register.html)
{% extends 'bootstrap/base.html' %}
{% import "bootstrap/wtf.html" as wtf %}

# 省略
       <div>
        {{ wtf.quick_form(form, novalidate=True, button_map={"submit": "primary"}) }}
      </div>

 # 省略
Finally, log out.
@app.route('/logout')
def logout():
    logout_user()
    return redirect(url_for('get_all_posts'))
Summary of this topic
In addition to the above, flask-login can easily use other useful functions such as remember me (using cookie), current_user, login_required, and so on. Also, error messages can be easily displayed in flash, which is also convenient!